• Skip to primary navigation
  • Skip to content
  • Skip to primary sidebar

Main navigation

  • Home
  • About
  • Recipes
  • Portfolio
  • Contact
  • Bloglovin
  • Facebook
  • Instagram
  • Pinterest
  • RSS

August 4, 2014

Easy Baked Tofu with Soba Noodles

Easy Baked Tofu with Soba Noodles | Gather & Dine

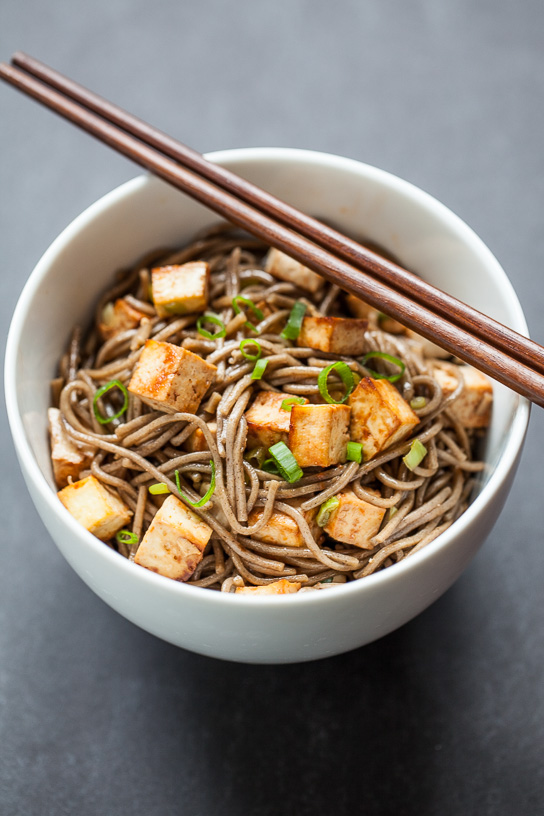
This Easy Baked Tofu with Soba noodles is one of our new favorite simple weekday meals.  Ryan used to be a tofu skeptic, but he has since come around after discovering how flavorful it can be.  The whole family loves this dish and the best part is that it only requires only a few ingredients and a few minutes of prep time.  After the tofu is baked, it becomes golden brown and crispy around the edges and pairs perfectly with the sesame soba noodles.  The key to achieving golden and crisp tofu is leaving enough space between each piece of tofu as it bakes.  If the pan is overcrowded, the cooking process becomes more similar to steaming and the tofu will still be flavorful, but the edges will remain soft.  This simple and delicious dish can be enjoyed warm or at room temperature.

Easy Baked Tofu with Soba Noodles | Gather & Dine

Print
Easy Baked Tofu with Soba Noodles
 
Ingredients

For the tofu:
  • 1 pound block firm tofu
  • 1½ tablespoons tamari or soy sauce
  • 1½ tablespoons ketchup
  • 1½ tablespoons toasted sesame oil

For the soba noodles:
  • 9 ounces soba noodles (3 3-oz. bundles), cooked
  • 1½ tablespoons soy sauce
  • 1½ tablespoons olive oil
  • 1 teaspoon sesame oil
  • ¼ cup chopped scallions
Instructions
  1. Preheat oven to 400.
  2. Cut the tofu into ½-inch cubes and arrange in a single layer on a large baking sheet.
  3. Whisk together the tamari, ketchup, and sesame oil. Pour over the tofu and use a rubber spatula to turn and evenly coat each piece of tofu.
  4. Bake uncovered for 25-30 minutes, using a metal spatula to gently flip the tofu once or twice for even baking.
  5. While the tofu is baking, whisk together the soy sauce, olive oil, and sesame oil for the soba noodles.
  6. Pour the soy sauce mixture over noodles and toss to coat. Add the baked tofu and scallions and toss once again. Garnish with additional green onions and sesame seeds, if desired.
Notes
adapted from The Moosewood Restaurant Cooking for Health
3.2.2499


Continue Reading

July 31, 2014

Blackberry Vanilla Bean Tartlets

blackberry-vanilla-bean-tartlets-3

My sister and brother-in-law flew in for a visit last week with their adorable 20-month old twins.  Now that we live so far apart, I always cherish the times we are able to spend together.  Their visit was the perfect excuse to make a celebratory dessert and with all of the small kids, I decided tartlets would be the perfect thing.

These Blackberry Vanilla Bean Tartlets are just the right size for little kids to each have their own and adults can have two (or three!) without feeling overly indulgent.  The tartlets have a tender cookie crust and are filled with a white chocolate and vanilla cream filling.   I used the same ingredients as I did in my Berries with White Chocolate Mascarpone for the cream filling, but this time I whipped the cream for a lighter mousse-like consistency.  I also used a vanilla bean instead of vanilla extract so that the beautiful flecks of vanilla would be visible.  Feel free to substitute vanilla extract for the vanilla bean if you prefer, however.  The crust is the same that I used in the Raspberry Frangipane Tart, although this time the crusts were pre-baked before adding the filling.

After making 24 tartlets, there was a little bit of dough and filling left over.  Rather than wait for the tartlets to bake, cool, and assemble all over again, I just let the kids use their cookie cutters to make little cookies topped with some cinnamon sugar.  And leftover filling makes a great fruit dip!  These tartlets are best served on the day they are made, but they can also be refrigerated and enjoyed the next day as well.

Blackberry Vanilla Bean Tartlets

Print
Blackberry Vanilla Bean Tartlets
Serves: 24 2½-inch tartlets
 
Ingredients

  • For the Crust:
  • 1½ cups all-purpose flour
  • 1 cup whole wheat pastry flour
  • 3 tablespoons sugar
  • 16 tablespoons (2 sticks) unsalted butter, chilled
  • 2 egg yolks, lightly beaten
  • 4 tablespoons ice water

  • For the Vanilla Bean Cream:
  • 6 ounces white chocolate
  • 8 ounce container mascarpone cheese
  • 1 vanilla bean
  • 1 cup heavy whipping cream

  • For Assembly:
  • 1-2 pints blackberries
  • 1-2 tablespoons powdered sugar
Instructions
For the Crust:
  1. Place the flour and sugar into a food processor and give a quick pulse to combine. Cut the butter into small cubes and add to the flour and sugar. Pulse until mixture resembles a course meal, about 10 seconds. (Alternatively, use a pastry blender to cut the butter cubes into the flour and sugar.)
  2. With the food processor running, gradually add the egg yolks and then the ice water. Process until the dough just comes together.
  3. Using hands, form 2 disks with the dough and tightly wrap each with plastic wrap. Chill dough for at least one hour.
  4. Preheat oven to 375.
  5. Using one disk at a time, roll dough on a floured surface until dough becomes about ⅛" thick. Cut out circles slightly larger than the diameter of the tart tins. (I used a drinking glass to help cut the circles.) Gently press the dough circles into the tart tins and trim off any extra dough. Prick crust a few times with the tines of a fork. Repeat until all 24 tart tins are lined with crust. Place tart tins in the refrigerator to chill for 1 hour.
  6. Place tartlet crusts on a large baking sheet and bake at 375 for 18-20 minutes, rotating pan halfway for even baking.
  7. Allow crusts to cool in the tins for 10 minutes. Gently flip tins over to remove crusts and place on wire racks to cool completely.
For the Vanilla Bean Cream:
  1. Set a small glass mixing bowl over a small saucepan of simmering water and place the chocolate in the mixing bowl. Stir until the chocolate is completely melted. Remove the glass bowl from the heat and set aside to cool for 5-10 minutes.
  2. While the chocolate is cooling, split the vanilla bean in half using a paring knife. Then use a small spoon to scrape of seeds out of each half. Whisk the vanilla bean seeds with the mascarpone cheese. Gradually whisk in the melted white chocolate and set aside.
  3. Using a stand mixer, whip the heavy whipping cream to form soft peaks. Use a spatula to gently fold the whipped cream into the mascarpone mixture.
For Assembly:
  1. Spoon a small portion of the vanilla bean cream into each of the tartlet crusts. Top with blackberries. Depending on the size of the blackberries, it may be necessary to cut the blackberries in half. Sprinkle with powdered sugar right before serving.
Notes
crust adapted from The Martha Stewart Cookbook
filling adapted from Bon Appetit
3.2.2499


Continue Reading

July 28, 2014

Summer Squash Casserole

Summer Squash Casserole | Gather & Dine

We love our neighborhood.  Everyday we get to hear the beautiful sounds of birds and the quiet rustling of leaves.  We are surrounded by nature trails and we have a nearby swimming pond.  We have witnessed baby robins hatching out of their eggs, little fawns splashing in the water, and red foxes running across our yard.  I am so incredibly thankful for all of these things.  I can honestly say, however, that the neighbors are the very best part about living in our neighborhood.  We have been blessed with the most wonderful neighbors I could ever ask for.

One of our neighbors stopped by last week to share some beautiful zucchini and summer squash they had grown in a local community garden.  What a gift, knowing that they had thought of us and wanted to take time out of their busy schedules to bring us these fresh vegetables.  Such little acts of kindness and thoughtfulness can mean so much.

After receiving the garden-fresh produce, I knew exactly what I wanted to make.  This Summer Squash Casserole is the perfect way to dress up summer squash and zucchini.  The vegetables are lightly sautéed and tossed with manchego and parmesan, and then baked with eggs and a crunchy bread crumb topping.  It makes a great brunch dish or can also be used as an accompaniment to some grilled meat or fish.  I hope you enjoy this colorful summer dish as much as I do.

Summer Squash Casserole | Gather & Dine

Print
Summer Squash Casserole
Serves: 6-8 side portions
 
Ingredients
  • 2 tablespoons butter, divided
  • 1 tablespoon olive oil
  • 1 cup finely chopped onion, about 1 medium onion
  • 1 medium zucchini (1 pound), medium diced
  • 1 medium yellow summer squash (1 pound), medium diced
  • 1 small tomato, seeded and medium diced
  • ¼ cup grated parmesan cheese
  • 1 cup grated manchego cheese, divided
  • 1 cup fresh breadcrumbs, divided*
  • 2 large eggs, lightly beaten
  • 1 teaspoon kosher salt
  • ¼ teaspoon ground black pepper
Instructions
  1. Preheat oven to 375. Lightly coat an 8x8-inch or similar size baking dish with olive oil.
  2. In a skillet, melt the olive oil and 1 tablespoon of butter over medium heat. Add the onion and sauté until onion softens and starts to become translucent, about 5 minutes. Add the zucchini, summer squash, and tomato and continue sautéing until zucchini and summer squash begin to soften, about 7-8 minutes. Allow the squash mixture to cool for 10 minutes.
  3. Stir in the parmesan, ¾ cup manchego, and ½ cup of breadcrumbs. Add the eggs, salt, and pepper and stir again. Transfer mixture to prepared baking dish.
  4. In a small bowl, mix together the remaining ¼ cup manchego and ½ cup bread crumbs. Melt the remaining 1 tablespoon of butter and drizzle over the breadcrumbs, tossing to ensure breadcrumbs are coated evenly. Sprinkle the breadcrumbs mixture over the summer squash mixture.
  5. Bake for 30 minutes, until the top becomes crisp and golden brown.
Notes
adapted from The Blackberry Farm Cookbook

*To make fresh bread crumbs, cut some day old bread into cubes and pulse in the food processor until bread becomes crumbly.
3.2.2499


Continue Reading
  • « Previous Page
  • Page 1
  • …
  • Page 55
  • Page 56
  • Page 57
  • Page 58
  • Page 59
  • …
  • Page 69
  • Next Page »

Primary Sidebar

wholesome recipes

made for sharing

browse

posts

Categories

Archives

Your

favorites

Roasted Harvest Salad + Champagne Vinaigrette
Sausage and Kale Spaghetti Pie
Griddled Pumpkin Steel-Cut Oatcakes
Chocolate Fig Swirl Rolls

Subscribe

by email

Load More...
Follow on Instagram

Follow

on instagram

© GATHER AND DINE 2025. SITE DESIGN BY WOODEN SPOONS KITCHEN