• Skip to primary navigation
  • Skip to content
  • Skip to primary sidebar

Main navigation

  • Home
  • About
  • Recipes
  • Portfolio
  • Contact
  • Bloglovin
  • Facebook
  • Instagram
  • Pinterest
  • RSS

October 30, 2014

Barley Chorizo Skillet Pie

Barley Chorizo Skillet Pie | Gather & Dine

Deciding to incorporate more whole grains into our diet has been one decision I’ve had absolutely no regrets about.  It’s opened up so many doors to exploring new foods and it’s made such a difference in feeling healthy and satisfied after each meal.  Barley was one of those grains that I had found intimidating because there are so many varying types of barley- pearled, hulled, hull-less- and I wasn’t exactly sure what made each type distinct.  After doing some research, I learned that hulled barley has an inedible hull that is removed during minimal processing, but most of the nutrients are retained.  Hull-less barley is a type of barley in which the hull easily falls off during harvesting, leaving the bran intact and retaining all nutrients.   Pearl barley has been processed to move the hull and outer bran layer, thus also stripping it of many of its nutrients.  Pearl barley requires the shortest amount of cooking time, while the hulled and hull-less variety require slightly more time.  I used hull-less barley for this Barley Chorizo Skillet Pie, but other types of barley can be substituted as long as cooking times are adjusted.  Barley is a versatile grain with a pleasant chewy texture.  It adds such great dimension to this egg-based skillet pie.

Barley Chorizo Skillet Pie

Barley Chorizo Skillet Pie | Gather & Dine

Barley Chorizo Skillet Pie | Gather & Dine

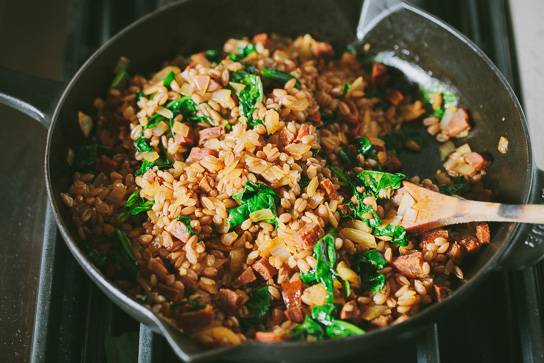
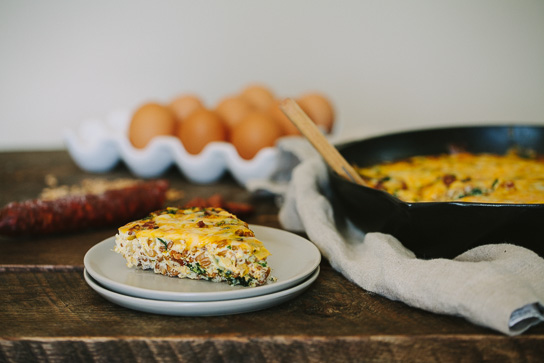
I tend to cook a lot of meals that are mostly grains and vegetables, but also involve a little bit of meat for substance and flavor.  This Barley Chorizo Skillet Pie is one example where a little bit of chorizo adds a big punch of flavor to the entire dish.  We enjoy this served warm or at room temperature and it makes a great breakfast, lunch, or dinner.

Print
Barley Chorizo Skillet Pie
 
Ingredients
  • ⅔ cup uncooked hull-less barley
  • 7 large eggs
  • ¼ cup milk
  • ¼ cup chopped cilantro
  • ¾ teaspoon sea salt
  • 1 tablespoon olive oil
  • 1 large onion, finely diced
  • 4 ounces Spanish cured chorizo, diced
  • 2 cloves garlic, minced
  • 2 cups lightly packed baby spinach
  • ¾ cup grated Colby Jack Cheese
Instructions
  1. In a medium saucepan, bring 3 cups of water to a boil. Add the barley and return to a boil over medium heat. Lower the heat and simmer until barley is tender, but still chewy, about 40-50 minutes. Drain and set aside.
  2. Preheat the oven to 350.
  3. In a medium mixing bowl, whisk together the eggs, milk, cilantro, and salt.
  4. In a 10- or 12- inch cast iron skillet, heat the olive oil over medium heat. Add the onion and chorizo and sauté until onion starts to become translucent, about 5 minutes. Add the garlic and cook for another minute. Add the spinach and stir until spinach is just wilted. Stir in the barley last.
  5. Pour the egg mixture over the vegetable-barley mixture and stir until combined.
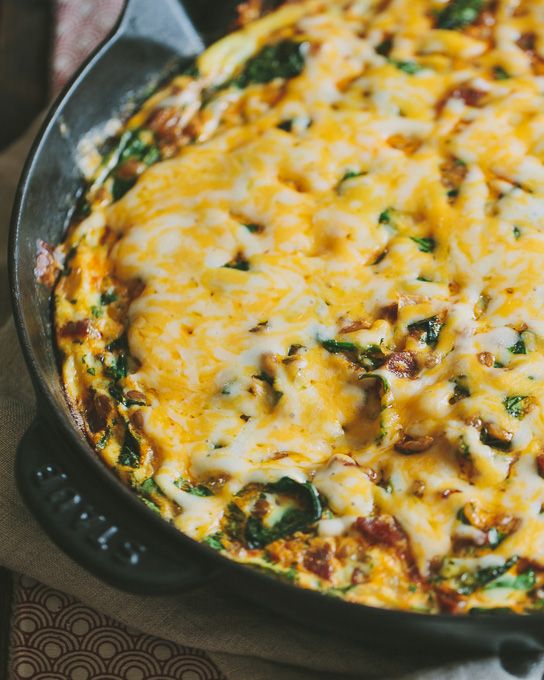
  6. Bake for 25 minutes, until eggs are set and edges are starting to brown. Sprinkle cheese over top and bake for another 5 minutes. Let rest for 5 minutes before slicing into wedges.
Notes
adapted from Whole Grains Every Day Every Way
3.2.2499


Continue Reading

October 26, 2014

Crispy Brussels Sprout Chips

Crispy Brussel Sprout Chips | Gather & Dine

I know it’s going to be hard for some people to imagine ever becoming excited about brussels sprouts.  Believe me, there was a time when I would have also turned my head on them.  The day I discovered these crispy brussels sprout chips, however, everything changed and all of the sudden brussels sprouts became exciting to me.  And because I am so excited about these brussesl sprouts, I must tell you about them.  Whenever I used to roast brussels sprouts, the favorite part was always the extra leaves that fell off of the main core.  These little leaves would become crisp and crunchy during the roasting, similarly to how kale becomes crispy when making kale chips.  It took me several batches of roasted brussel sprouts, but it finally occurred to me that I could just separate all of the brussel sprout leaves and make an entire batch of brussel sprout chips.  My ideas do not always work out, but this one was a winner. We adore these.  A few tips if you decide to give these a try:

  •  When peeling off the leaves, it may become necessary to cut more stem off of the brussels sprout to loosen the leaves.
  • Using your hands to toss the leaves in olive oil helps to ensure that each leaf is evenly coated with oil.
  • Salt is essential for flavor, but a little goes a long way.
  • Do not overcrowd the pan or the brussel sprouts will not become crunchy.  If you double the recipe, use two separate baking sheets.
  • Some leaves will turn crispy sooner than others.  In order to avoid burnt brussels sprout chips, remove the leaves from heat once they become crisp and brown while allowing the rest to continue roasting.

So happy that brussels sprouts are now in the rotation of family dinner vegetables!

Crispy Brussel Sprout Chips | Gather & Dine

Print
Crispy Brussels Sprout Chips
 
Ingredients
  • 1 pound brussels sprouts
  • 1 tablespoon olive oil
  • sea salt and freshly ground black pepper to taste
Instructions
  1. Preheat the oven to 350.
  2. Cut the ends off brussels sprouts and peel off leaves of each sprout. As you reach towards the center of the sprout, you may need to cut more stem in order to peel off the leaves.
  3. Place leaves on a large rimmed baking sheet and use hands to toss with olive oil, salt, and pepper until leaves are evenly coated.
  4. Bake for 15 minutes, stirring every 5 minutes, until brussels sprout leaves are cripsy and the edges begin to brown. To avoid burnt brussels spout chips, remove the leaves once they become crisp and brown while allowing the rest to continue roasting.
3.2.2499


Continue Reading

October 23, 2014

Turkey Pot Pie {with a Cheddar Crust)

Turkey Pot Pie {with a Cheddar Crust} | Gather & Dine

Turkey Pot Pie holds a special place in my heart as it was the first meal Ryan’s parents cooked for me when I first visited them at their home.  They immediately made me feel welcome and at ease and I have fond memories of meeting them.  I love their twist on the traditional pot pie and this has become a favorite meal in our family too.  Over the years I’ve adapted it slightly by using butter rather than shortening and incorporating some whole wheat pastry flour in the crust, but it still has the same delicious flavor.  Adding cheddar cheese makes the crust extra special and complements the turkey filling perfectly.  I used turkey drumsticks for the filling, but this is also a wonderful way to use up leftover turkey from Thanksgiving.  Homemade turkey stock is essential and is the base to making this dish truly spectacular.  I admit this is not the quickest meal to prepare, but I promise the all of the time invested will be worth it.  I usually roast the turkey and make the stock on one day and prepare the filling and crust the next day.  Breaking it up into two days requires some planning ahead, but it seems to make everything much more manageable.  This recipe is enough for 6 individual pot pies or it can also be made in a 9×13 casserole dish.

Turkey Pot Pie {with a Cheddar Crust} | Gather & Dine Turkey Pot Pie {with a Cheddar Crust} | Gather & Dine

Print
Turkey Pot Pie {with a Cheddar Crust)
 
Ingredients
Turkey
  • 3-4 pounds Turkey drumsticks
  • 1½ tablespoon kosher salt
  • 1 teaspoon ground black pepper
  • 1½ teaspoon sage
  • 2 tablespoons unsalted butter, softened
Filling
  • 6 tablespoons butter
  • 2 cups diced onion, about 2 onions
  • 1 cup finely diced carrots, about 3 carrots
  • 1 teaspoon kosher salt
  • dash of sage, ground thyme, and black pepper
  • ½ cup + 2 tablespoons all-purpose flour
  • 4 cups turkey stock
  • 4 cups shredded or diced cooked turkey
  • 1 cup frozen green peas
Cheddar Cheese Crust
  • 1 cup all-purpose flour
  • 1 cup whole wheat pastry flour
  • ¾ teaspoon fine grain sea salt
  • ¾ cup grated sharp cheddar cheese
  • 10 tablespoons unsalted butter, chilled and cut into cubes.
  • 5 tablespoons ice water
  • 1 egg + 1 tablespoon water, optional for egg wash
Instructions
Turkey
  1. Preheat oven to 400.
  2. In a small bowl, combine the salt, pepper, and sage. Sprinkle mixture over turkey drumsticks and use hands to season under the skin when possible. Spread softened butter evenly over the turkey.
  3. Roast turkey for 15 minutes at 400. Lower heat to 325 and continue roasting turkey for another 40-60 minutes, depending on the size of the turkey pieces. Turkey is done when skin is golden brown and meat thermometer registers at 165. Remove turkey from heat and allow at least 30 minutes to cool.
  4. When turkey is cool enough to handle, remove skins and discard. Use hands or two forks to shred enough meat to make 4 cups. Do not worry about removing all of the meat from the bones. The meat left on the bones will help make the broth rich and flavorful.
  5. In a large pot, bring 10 cups of water, turkey bones, and drippings to a boil. Reduce heat and simmer for 3 hours. Strain stock and set aside 8 cups.
Filling
  1. In a large pot, melt butter over medium high heat. Add onions, carrots, and seasonings and sauté until onions start to become translucent, about 5-7 minutes.
  2. Sprinkle flour over onions and carrots and stir together for another minute. Gradually add turkey stock and stir until thickened. Add turkey meat and peas and cook for another 5 minutes.
Cheddar Cheese Crust
  1. In the bowl of a food processor, add the flour, salt, and cheddar cheese. Pulse to combine. Sprinkle butter cubes over mixture and pulse again until mixture resembles coarse crumbs. Add the water and process until just combined. Form a disk with the dough and chill for 30 minutes.
  2. Roll dough large enough to cover a 9x13 baking dish or to make 6 individual circles.
Assemble and Bake
  1. Preheat oven to 400.
  2. Divide filling evenly between 6 individual bowls or pour into a 9x13 baking dish. Gently place crust on top and trim off excess crust. Use a fork to decoratively trim the edges. Cut slits in the top to allow steam to escape. Brush with egg wash if desired.
  3. Bake for 30-40 minutes until crust turns golden brown and filling is heated through.
3.2.2499
Continue Reading
  • « Previous Page
  • Page 1
  • …
  • Page 47
  • Page 48
  • Page 49
  • Page 50
  • Page 51
  • …
  • Page 69
  • Next Page »

Primary Sidebar

wholesome recipes

made for sharing

browse

posts

Categories

Archives

Your

favorites

Roasted Harvest Salad + Champagne Vinaigrette
Sausage and Kale Spaghetti Pie
Griddled Pumpkin Steel-Cut Oatcakes
Chocolate Fig Swirl Rolls

Subscribe

by email

Load More...
Follow on Instagram

Follow

on instagram

© GATHER AND DINE 2025. SITE DESIGN BY WOODEN SPOONS KITCHEN