• Skip to primary navigation
  • Skip to content
  • Skip to primary sidebar

Main navigation

  • Home
  • About
  • Recipes
  • Portfolio
  • Contact
  • Bloglovin
  • Facebook
  • Instagram
  • Pinterest
  • RSS

February 18, 2015

Chicken and Green Olive Taquitos

Chicken and Green Olive Taquitos

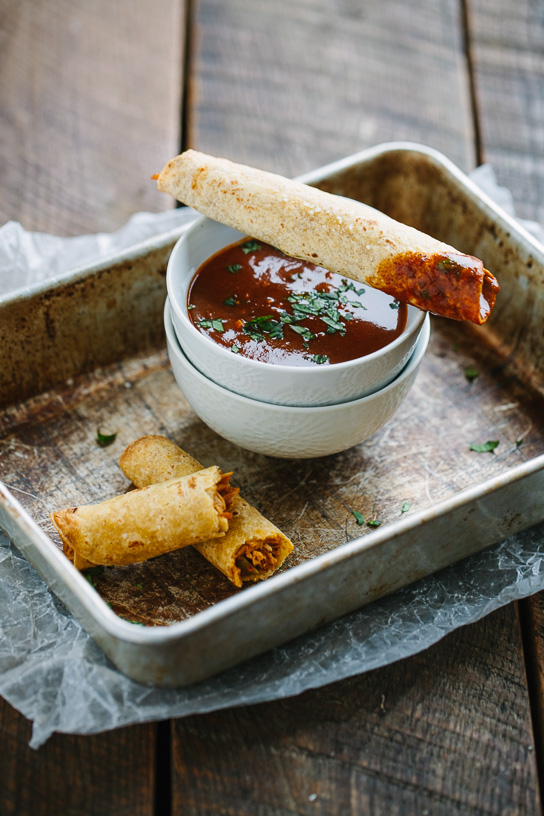
It was large batch taquito making this past weekend with turkey spinach taquitos and also these chicken and green olive taquitos.  Taquitos make great freezer meals and I try hard to always keep a supply handy for busy days when there’s no time for cooking or for when I need a quick last minute meal.  Unlike casseroles, it’s easy to take out just what you need, whether it’s just a few or the whole batch.  Every so often I’ll make a meal I know my husband and I will really enjoy, but not necessarily the kids and while I always encourage the kids to try whatever is being served, sometimes I’ll take a couple taquitos out for them as back-up.  These particular taquitos are inspired by some green olive enchiladas that I used to frequently make years ago, but had somehow forgotten about more recently.  Enchiladas are great, but taquitos are a bit less messy and more kid-friendly so I made a taquito version of those enchiladas with all of the same great flavors.  Lots of warm spices in these- chili, cumin, oregano, and a hint of cinnamon.   Secret ingredient here is a little dark chocolate that is melted into the sauce at the very end to give it some complexity and depth.  In the past, I’ve always struggled with natural corn tortillas falling apart and crumbling any time I tried to work with them.  I finally discovered these corn tortillas at Whole Foods however and they are much more pliable and easy to work with.  If you can’t find a good corn tortilla, any flour or multi-grain tortilla would be a good substitute.  Happy taquito-making!

Chicken and Green Olive Taquitos

Print
Chicken and Green Olive Taquitos
Serves: makes 24 taquitos
 
Ingredients
  • 2 tablespoons olive oil
  • 1 cup finely chopped onion
  • 3 tablespoons minced garlic
  • 1½ teaspoons dried oregano
  • 1 teaspoon cumin
  • ⅛ teaspoon cinnamon
  • 2 teaspoons kosher salt
  • ½ teaspoons ground black pepper
  • 4 tablespoon chili powder
  • 3 tablespoons all-purpose flour
  • 4 cups reduced sodium chicken broth
  • ½ ounce dark chocolate, chopped
  • 4 cups shredded cooked chicken breasts, about 3 breasts
  • 1 cup green olives, sliced
  • 8 ounces Monterey Jack cheese, shredded
  • 24 6-inch corn tortillas
  • olive oil for finishing
  • coarse salt for sprinkling
Instructions
  1. In a large saucepan or heavy pot, heat olive oil over medium heat. Add onion, garlic, oregano, cumin, cinnamon, salt, and pepper. Sauté until onions soften and start to become translucent, about 5-8 minutes. Add chili powder and flour and stir constantly for another 2-3 minutes. Gradually whisk in the broth. Increase the heat to medium-high and bring mixture to a boil. Continue to boil for 30 minutes or until liquid is reduced to 3 cups, stirring occasionally. Remove from heat and stir in chocolate. Season with additional salt and pepper to taste. Set aside to cool.
  2. Preheat oven to 400. Lightly oil a large baking sheet.
  3. In a large mixing bowl, combine chicken, olives, shredded cheese, and 1½ cups of the cooled sauce.
  4. Spoon about 3 tablespoons of filling onto the middle of a tortilla. Roll up taquito and place seam side down on prepared baking sheet. Repeat with the remaining tortillas.
  5. Use a pastry brush to brush a light coating of olive oil onto each taquito. Sprinkle with coarse salt to finish.
  6. Bake at 400 for about 25 minutes, until taquitos are lightly golden brown. Serve with the remaining sauce on the side for dipping.
Notes
To freeze, place each taquito on a baking sheet, making sure that taquitos are not touching one another. Freeze the whole tray for a few hours and then transfer the taquitos to a gallon-sized ziploc bag for storage.

inspired by Green Olive Enchiladas from Colorado Colore
3.2.2499
Continue Reading

February 14, 2015

Raspberry Hand Pies

Raspberry Hand Pies | Gather & Dine

Isn’t everything more fun to eat when it’s shaped in a heart? I just couldn’t resist sharing these little raspberry hand pies with you today.  I used the same dough as I did this these chocolate hazelnut toaster pastries and filled each with a couple teaspoons of jam.  Surprisely simple, yet still special.

Wishing you all a beautiful day filled with love.

Raspberry Hand Pies | Gather & Dine

Print
Raspberry Hand Pies
Serves: 10-12 hearts, depending on size
 
Ingredients
  • 2 cups spelt flour
  • ¼ cup raw unsalted pumpkin seeds
  • ¼ cup raw unsalted sunflower seeds
  • ¼ cup coconut sugar
  • ½ teaspoon salt
  • 8 tablespoons unsalted butter, chilled
  • 2 teaspoons cider vinegar
  • about ½ cup good quality raspberry jam
  • coarse finishing salt and turbinado sugar for sprinkling on top
Instructions
  1. In the bowl of a food processor, add the pumpkin seeds and sunflower seeds. Process until seeds are finely ground. Add the flour, sugar, and salt and pulse to combine. Add the butter and pulse again until the mixture resembles coarse crumbs.
  2. In a small bowl, combine vinegar and 6 tablespoons of ice water. With the food processor running, gradually add the vinegar and water. Process just until mixture begins to clump together. Transfer mixture to a lightly floured surface and finish kneading together by hand. Form dough into a disk and wrap with plastic wrap. Chill about 30 minutes.
  3. Preheat oven to 400.
  4. On a lightly floured surface, roll the dough to approximately ⅛" thick. Use a shaped cutter to cut into hearts.
  5. Take one heart and spread 2 teaspoons raspberry jam in the middle, leaving a border around the edges. Top with another heart and use a fork to crimp the edges together. Repeat with the remaining hearts.
  6. Sprinkle tops with a generous pinch coarse salt and turbinado sugar.
  7. Bake for 11-13 minutes, until edges start to turn light golden brown. Cool for 5 minutes on tray and then transfer to a wire rack to finish cooling.
3.2.2499
Continue Reading

February 12, 2015

Dark Chocolate Hazelnut Butter Cups

Dark Chocolate Hazelnut Butter Cups

I would consider myself fairly low-maintenance when it comes to Valentine’s Day.  For the past few years, Ryan and I have decided it wasn’t worth fighting the restaurant crowds so we’ve just been enjoying quiet evenings at home.  I have also embraced my limits and decided that store-bought valentines will be just fine for my kids to give out this year (and probably every year from now on).  The first year my kids brought home valentines from their classmates, I was amazed at how creative some parents were in creating homemade valentine’s with their kids.  I attempted homemade valentines the following year, but it was stressful and it’s just not me.  More and more I’m realizing that it’s just not possible to be the super-fun-cool-hip-creative-mom in every single area of motherhood.  Of course we all hear things like this all of the time, but sometimes it’s hard for me to truly believe this in my heart.  I find myself needing to pray often that I would not compare myself with others because it never does any good.  This year we went to Target and the kids loved picking out their Valentine’s.  They are completely happy and I have no guilt for not taking the time to make them ultra-cute.

I do enjoy making cute Valentine’s Day treats however.  I’ve had these mini-wrappers in the bottom of my drawer for a few years now and I finally decided to use them on these Dark Chocolate Hazelnut Butter Cups.  I think when most people hear ‘chocolate hazelnut’,  Nutella probably comes to mind, but these dark chocolate cups actually feature vanilla hazelnut butter.  Smooth dark chocolate wrapped around pure vanilla hazelnut butter with a sprinkle of sea salt on top- *happy sigh*, it doesn’t get much better than this for me.  I wish I could send these in for the kids’ school parties, but the no-nut policy is understandably strict.  Too bad, I guess that means more for us!

Dark Chocolate Hazelnut Butter Cups

Dark Chocolate Hazelnut Butter CupsDark Chocolate Hazelnut Butter Cups

Print
Dark Chocolate Hazelnut Butter Cups
Serves: makes 15-16 mini-cups
 
Ingredients
  • 2 3.5 ounce dark chocolate bars, broken in pieces (I used 72%)
  • ⅓ cup vanilla hazelnut butter (see recipe here)
  • coarse salt for sprinkling
Instructions
  1. Line 15-16 mini-muffin tins with paper liners.
  2. Set a small glass mixing bowl over a small saucepan of simmering water and place the chocolate in the mixing bowl. Stir until the chocolate is completely melted and smooth.
  3. Taking one muffin liner at a time, place 1 teaspoon of melted chocolate into each cup and tilt slightly so the chocolate coats partway up the sides. Place muffin liner back into tin and repeat with the remaining cups.
  4. Using the palms of your hands, roll 1 teaspoon vanilla hazelnut butter into a slightly flattened ball and place in the center of each cup. Repeat with the remaining hazelnut butter until all cups are filled.
  5. Pour enough melted chocolate over the hazelnut butter to cover completely and form a smooth top, about 1 heaping teaspoon.
  6. Sprinkle coarse salt on top and chill in the refrigerator to set. Store in an airtight container at room temperature or in the refrigerator.
Notes
adapted from The Sprouted Kitchen
3.2.2499


Continue Reading
  • « Previous Page
  • Page 1
  • …
  • Page 37
  • Page 38
  • Page 39
  • Page 40
  • Page 41
  • …
  • Page 69
  • Next Page »

Primary Sidebar

wholesome recipes

made for sharing

browse

posts

Categories

Archives

Your

favorites

Roasted Harvest Salad + Champagne Vinaigrette
Sausage and Kale Spaghetti Pie
Griddled Pumpkin Steel-Cut Oatcakes
Chocolate Fig Swirl Rolls

Subscribe

by email

Load More...
Follow on Instagram

Follow

on instagram

© GATHER AND DINE 2025. SITE DESIGN BY WOODEN SPOONS KITCHEN